My Photos

Showing posts with label Christmas. Show all posts

Monday, December 5, 2011

Christmas Bird

I was going over some sketches that I keep in my sketch book and found this one. I liked the layout of it and thought it was the perfect sketch for combining different embossing folders. On this card I used the new Snow Burst folder and Northern Flurry. On the upper left corner I embossed just a couple of snowflakes from Northern Flurry and then on the lower right side, I used Snow Burst. 
 I made a little pine cone to tuck under my paper bow, along with some pine greenery. The paper bow is made from a piece of Frostwood Lodge DSP. LOVE that Designer Series Paper!!!! I added some Dazzling Details for the glittery snow on the pine branches and the pine cone.
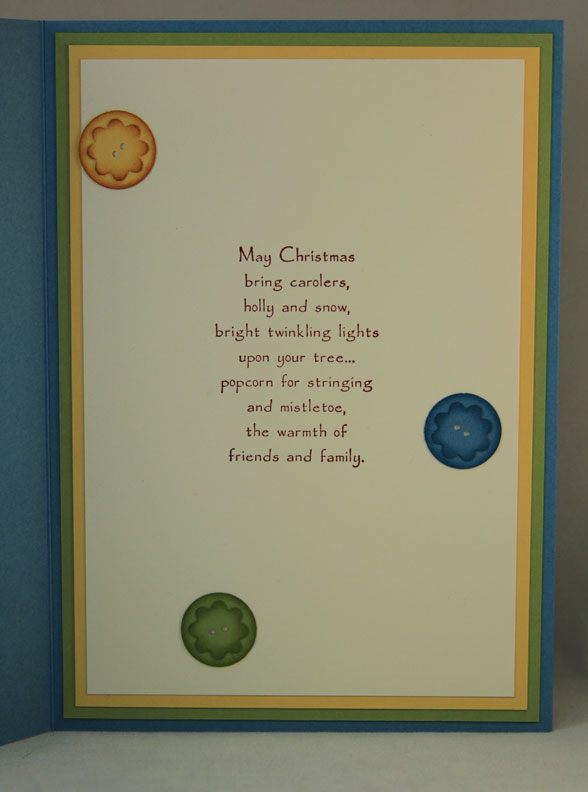
 My buttons are made with the 3/4" Circle punch and the Boho Blossoms punch. Just punch out a circle and a blossom, layer, and punch the button holes. I use a clear button that I die cut from my Buttons #5 Sizzlet. I lay my button hole template on my circle or flower, center it, mark the holes and punch with a 1/16" circle punch.
 On the inside, I added a couple of patches of 'flannel' paper from Frostwood Lodge. I punched them with the postage stamp punch and added another button that I made with punches.
 The Marina Mist button below looks like the center is layered on top in the photo (just noticed that), but it's not. I punched a 1/2" circle and then centered it in my 3/4" Circle punch and punched. I punched a whole 3/4" circle and inked up the inside edges of the 1/2" circle. Adhered the two circles together and inked around the edges of the button again with Marina Mist. The Cherry Cobbler button is die cut from Buttons #5.
Have a wonderful day today and thanks for visiting me here!!

Blessings!
Barb

Supplies:
Paper: Marina Mist, Whisper White, Old Olive, Cherry Cobbler, Chocolate Chip, Frostwood Lodge Designer Series Paper
Stamps: 
Classic Stampin' Ink: Cherry Cobbler, Marina Mist, Chocolate Chip, Whisper White (Craft Ink)
Punches: Scalloped Oval, Builder Bird, 3/4" Circle, 1/2" Circle, Boho Blossoms, Postage Stamp
Dies: Buttons #5
Other: Northern Frost and Snow Burst embossing folders, Stampin' Dimensionals, Dazzling Details glitter glue, white crochet thread, white gel pen


Friday, December 2, 2011

Digital Christmas Lodge :)

I'll be posting a card later, but in the meantime, I was playing in My Digital Studio :). I often like to design my cards first in My Digital Studio... A) there is no waste of real paper, B) it's easy to remove or add elements, C) you can see how it will look before you ever cut into any paper. For my card below I used the Frostwood Lodge Designer Series Digital Paper (we can print out as much as we want on our printers) and the Christmas Lodge digital stamp set. 

I love the Frostwood Lodge Designer Series Paper- the real paper, that is! I also love it in digital format and am soooooo happy that when it retires from the mini, I can still have as much as I need by printing it out :D.

I'll be back later after I get some pictures!

Blessings!
Barb

Supplies:
My Digital Studio

Wednesday, November 30, 2011

Come to Bethlehem

I hope everyone had a wonderful Thanksgiving! I've been busy decorating the house for Christmas, thus my absence, but I stopped today to make a Christmas card. I used Come to Bethlehem- love this set! I stamped my background first with En Francais in Crumb Cake, stamped off once. The edges of my image are aged with Soft Suede and a sponge dauber. I ink up my dauber first and then stamp off on a scrap of paper before applying to my image. It gives it a softer look.
 My poinsettia is done with the Five Petal punch, punched twice, petals curled with a chop stick, then layered. The center of my poinsettia is one of the flowers from the Boho Blossoms punch. Sponged the outer edges with Cajun Craze and then lined it up in the Snow Burst embossing folder.
 The inside is double matted and stamped in Cherry Cobbler with two more holly leaves to match the front of my card.
The card base is 5.5". The Marina Mist frame is 4.5 and the inside Night of Navy frame is 4 3/8". I cut the Very Vanilla 4 3/8" square. The inside mats are: Night of Navy- 5.25" square, Marina Mist- 5" square, and Very Vanilla is cut 3.5" square. Have a GREAT day everyone!!!!

Blessings!
Barb

Supplies:
Paper: Bashful Blue, Marina Mist, Night of Navy, Very Vanilla, Cherry Cobbler, Old Olive
Classic Stampin' Ink: Garden Green, Night of Navy, Cajun Craze, Cherry Cobbler
Stamps: Come to Bethlehem, En Francais
Punches: Five Petal, Boho Blossoms, 1/4" circle
Dies: Stocking Accents
Other: Snow Burst embossing folder, glue dots, Stampin' Dimensionals, gem

Tuesday, November 22, 2011

Christmas List Organizer

I saw this beyond brilliant idea on Artful Imagination's blog! She made a Christmas List Organizer! Every year I have several Christmas lists with me when I do my Christmas shopping, all written out on separate sheets of lined paper. You can imagine how much fun it is trying to switch between all those sheets of paper while shopping. With this little organizer you have all your Christmas lists handy in one conveniently sized little organizer, and it's pretty too! Many thanks to Artful Imagination for coming up with this fantastic organizer and sharing it! You have made my Christmas shopping so much easier!!!!

Back to the organizer :). She made inserts for the inside of her organizer, so I made my own inserts as well, using Word. I also made my organizer slightly different, in that I put a piece of Designer Series Paper at the top of mine to hide the top of my list sheets. I think that I'll make another one for next year and laminate my covers, so that all I have to do is print out new lists each year to add to the organizer. (Sigh) Hindsight is often better than foresight.


Have you started your Thanksgiving preparations yet? I'm off to start on mine now! I do a lot of baking for the holidays and it's so much easier to make up the pie crusts and freeze them a couple of days before I need them :). Have a great day today!

Blessings!
Barb

Supplies:
Paper: Baja Breeze, Marina Mist, Wild Wasabi, Real Red, Whisper White, Designer Series Paper (retired)
Classic Stampin' Ink: Garden Green, Melon Mambo, Wild Wasabi, Real Red
Stamps: Dear Santa, Sweets for the Sweet
Punches: 1" Circle, Decorative Label
Dies: Tasteful Trim, Stocking Accents, Northern Frost
Other: 1" Prong Fasterner

Saturday, November 19, 2011

My Daughter's Card

My daughter stamped a card for me recently :). She doesn't stamp often, but I thought her ideas for this card were cute. She used the Build a Bear dies to make a gingerbread girl. Ahhh, a child after my own heart ;-). Yeah, she totally owns it, lol!
 She used a Sizzix embossing folder and embossed the background and colored it in with Stampin' Write markers. A white gel pen added the frosting to the ginger girl.

On the inside of the card, she used the zig zag from the Tasteful Trim die and added stamped candies at the corners carrying the gingerbread theme to the inside. She stamped her sentiment and punched it out, then popped it up on Dimensionals.
Her card definitely expresses a warm and cozy Christmas. I can almost smell the gingerbread baking :-). Have a great weekend!

Blessings!
Barb

Supplies used:
Paper: Garden Green, Real Red, Whisper White, Chocolate Chip
Classic Stampin' Ink: Garden Green, Real Red
Stamps: Sweets for the Sweet, sentiment from a retired set
Dies: Build a Bear- Bear, Beary Dressy, Tasteful Trim
Punches: 1" Circle, Decorative Label

Wednesday, November 16, 2011

Christmas Collage

I've had this background stamp since it was introduced and have never inked it up until this weekend. I stamped the image with VersaMark and heat embossed in gold. I used my Watercolor Wonder Crayons to color in parts of the image. In case you want to use this image whole, the dimensions of the image are 4.5 x 5.75. My card is a 5x7 card.
After I had all the layers adhered down and finished my card, I decided that I should have inked the edges in Soft Suede for a more vintage look. Oh well, maybe I'll make another one :). Have a great day!

Blessings!
Barb

Supplies:
Paper: Very Vanilla, Real Red, Always Artichoke, Basic Black, gold glitter paper, gold metallic card stock
Classic Stampin' Ink: Cherry Cobbler
Stamps" Christmas Collage, Teeny Tiny Wishes
Dies: Stocking Accents, Timeless Type
Punches: Word Window, 1.75 Circle, Scallop Edge Border
Embossing Folder: Square Lattice
Other: VersaMark, gold embossing powder, Watercolor Wonder Crayons, Blender pens, Stampin' Dimensionals

Tuesday, November 15, 2011

A Sweet Gift Box

As a demonstrator, I have access to a lot of wonderful ideas and projects, not only through Stampin' Connection (an online community for demonstrators only), but also through the Stampin' Up! site for demonstrators. We have access to online videos showing projects made with Stampin' Up! products. The gift box below was one of the video projects. I used different stamps to make mine and different ribbon and a different tag, but the box idea came from Stampin' Up! To make the box itself, you simply die cut two Fancy Favor boxes, stamp them, and then slip one box into the other. The result is a box that is closed on both ends, but easy to open :). 
For my box I used Real Red, Very Vanilla, and Always Artichoke. Those are great colors to use for Christmas projects! My tag is made with the Ovals die and the Designer Frames embossing folders. I used the medium oval for the tag and embossed it inside the Designer Frames folder. For the center of the tag, I die cut the smallest oval and embossed it with the Square Lattice embossing folder. I finished off the tag with a stamped image from Winter Post. Adhere some seam binding ribbon and add a bow and you have a pretty box for a gift or for special treats. I may add home baked Christmas cookies to mine- this is ideal packaging for a few Christmas cookies :). I hope your day is wonderful today! See you tomorrow!

Blessings!
Barb

Supplies:
Paper: Real Red, Very Vanilla, Always Artichoke
Classic Stampin' Ink: Cherry Cobbler, Soft Suede, Always Artichoke
Stamps: Winter Post
Dies: Fancy Favor, Ovals
Embossing Folders: Designer Frames, Square Lattice
Other: Always Artichoke Seam Binding ribbon, gold crochet thread, 1/8 Circle punch

Friday, November 11, 2011

Polar Party

This is a very 'non-traditional color' Christmas card. I used Melon Mambo and Pacific Point along with Very Vanilla. I also had a difficult time photographing this one! Please forgive the photos, and hopefully you can get the idea of how this card looks in real life :). The trees and the penguins with their stacks of gifts were stamped on watercolor paper with StazOn Jet Black ink. You will want to use a permanent ink instead of a dye based ink for water coloring. I used my Watercolor Wonder Crayons and a blender pen to color my images. There is actually a lot of sparkle on this card. I used Dazzling Details to highlight the snow and the Christmas Trees and the snowflakes are die cut from white glitter paper. I love these little penguins- they are just soooooo cute!!!!!
 
For the inside of this card, I layered two snowflakes and both are die cut from more glitter paper. I used a scrap that I had leftover from my card front to 'hang' the snowflake from :). The Northern Frost snowflakes are so pretty and detailed and they layer together beautifully! 

It's getting colder where I live- brrrr! Dropping down into the low 30's at night. The leaves are almost completely off the trees now too. Time for the land to rest until Spring :). I hope you all have a wonderful autumn weekend!

Blessings!
Barb

Supplies:
Paper: Melon Mambo, Pacific Point, Very Vanilla, watercolor paper, glitter paper
Stamps: Polar Party, inside sentiment from a retired set
Classic Stampin' Ink: Melon Mambo, Pacific Point
Other Ink" StazOn Jet Black
Dies: Northern Frost
Other: Watercolor Wonder Crayons, gems
Textured Impressions Embossing Folders: Snow Burst

Thursday, November 10, 2011

Make Your Own Stamps :)

After adding the labels to one of my clear mount stamp sets, I had a big chunk of blank rubber left over. I was looking at it and thinking it was such a shame to waste that big chunk of rubber, lol! So I die cut the chunk of rubber with my Big Shot and my Stocking Accents die :D. The background paper you see on the card below was stamped with my new die cut stamps, except for the stars. Pretty nifty, huh? After I stamped the background, I ran the card stock through my Big Shot in the Square Lattice embossing folder to add some texture. I also ran my Cherry Cobbler faux ribbon (card stock) through my Big Shot in the Petals-a-Plenty embossing folder. This was a really quick card to make!

 On the inside, I added my sentiment (retired stamp set) in Cherry Cobbler, and die cut the holly leaves from Wild Wasabi and added a little punched heart in Cherry Cobbler- done!
Wishing you a wonderful day today!

Blessings!
Barb

Supplies:
Paper: Cherry Cobbler textured, Very Vanilla, Wild Wasabi
Classic Stampin' Ink: Wild Wasabi, Cherry Cobbler, More Mustard
Stamps: Perfect Punches, my own stamps made with the Stocking Accents die :D, inside sentiment (retired set)
Punches: 1 3/8" Circle, 1 3/4" Scallop Circle, Small Heart
Dies: Stocking Accents
Other: Square Lattice embossing folder, Petals-a-Plenty embossing folder

Wednesday, November 9, 2011

Snow Much Fun

Did I ever mention that I love snowmen? I have a whole section of my home dedicated to snowmen when I decorate for Christmas :). What's not to love about snowmen? I love the snowman images in Snow Much Fun, so I pulled that set out last night and water colored it with my Watercolor Wonder Crayons and my blender pens. I love to water color! It's so relaxing! There is a lot of sparkle on this card, but unfortunately, the camera didn't pick it up when I photographed it (rainy day here so drab and dreary out and no bright sunlight). I added Dazzling Details glitter glue to the snowman and the little Christmas Tree, and of course, to the snow :). The snowflake is die cut from glitter card stock. I stamped a few buttons from the Button, Button stamp set. I punched the center holes of the button with a 1/16" circle punch and the circle punch from Itty Bitty Shapes punch pack.
 I added a few buttons to the inside that I made with punches that were inspired by the Button, Button stamp set. Are these buttons not the cutest thing?!
 To make the button, punch the little flower out from the Boho Blossoms punch, ink around the edge, and then punch a 3/4" circle and ink around the edge again. Glue the flower to the circle. Mark the center to punch the holes (1/16" circle punch) for the button, (I used a stamped button from Button, Button for a template to mark where the holes should go), and viola! Cute buttons!
Have a GREAT day today!!

Blessings!
Barb

Supplies:
Paper: Marina Mist, Pear Pizzazz, So Sffron, Very Vanilla, water color paper, Designer Series Paper Hostess  Pack (retired- but you can purchase the new Pear Pizzazz Designer Series Paper)
Classic Stampin' Ink: Cherry Cobbler, More Mustard, Marina Mist, Pear Pizzazz
Stamps: Snow Much Fun, Button, Button, Teeny Tiny Wishes, inside sentiment from a retired set
Dies: Northern Frost
Punches: Modern Label, Word Window, Itty Bitty Shapes punch pack, 3/4" Circle, Boho Blossoms
Other: Watercolor Wonder Crayons, Dazzling Details glitter glue, Snow Burst embossing folder, Stampin' Dimensionals

Tuesday, November 8, 2011

Christmas Stocking Banner

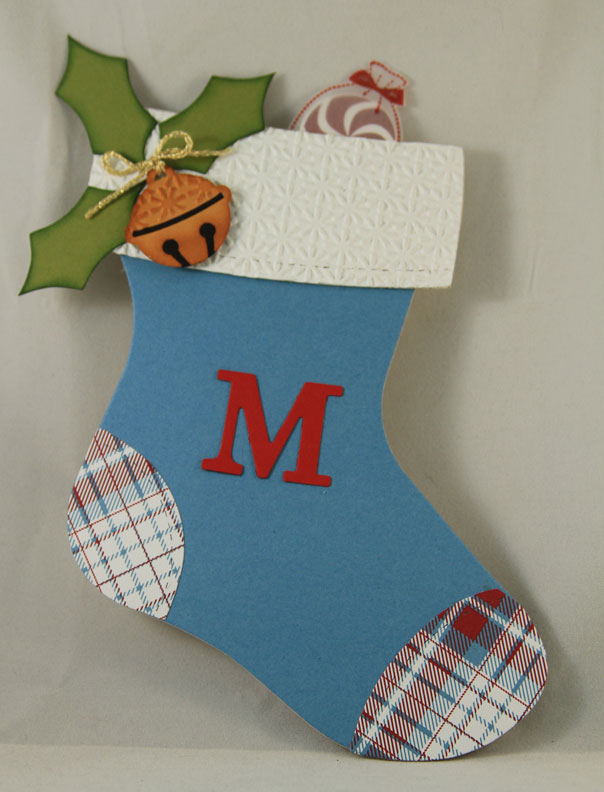
THIS is the project that started with my creative spark from visiting the flea markets and antique malls over the weekend. I was so happy to be feeling creative that I stayed up all night on Saturday evening! I was tired on Sunday, but it was so much fun to be in the creative flow again, that I didn't want to stop :). I made a banner using the Stocking die in the Holiday Mini. If you don't have this die yet, you really should get it! I did individual photos of each stocking for you, with the full banner at the end. I plan to attach them together with seam binding ribbon, but I'm torn between Baja Breeze and Cherry Cobbler. Hmmmm, maybe Always Artichoke seam binding ribbon? I can't decide (sigh). My stocking banner spells out 'Merry' and I plan to use this in my Christmas decorating this year. I die cut the stockings and the cuffs from acid/lignin free mat board so that it would be sturdier and hold up for a few years :). I covered the stocking with Marina Mist, the cuffs with embossed Whisper White, and the little stocking toe and heel is die cut from Frostwood Lodge Designer Series paper in the Holiday Mini. A few of the elements in the stockings are die cut from mat board and covered with card stock or Designer Series Paper as well. If you make one of these, use your own judgement as to what elements you die cut from mat board. Timeless Type die cut letters were used for each stocking. The first stocking is the M in Merry. I used the holly leaves die cut from the Stocking Accents die in the Holiday Mini and added a jingle bell punch. The jingle bell is punched from More Mustard, backed with Basic Black, and the top of the bell only has been embossed with the Snow Burst folder (Holiday Mini). The bell was also inked with More Mustard ink. I stamped the little candy bag on vellum and adhered my Cherry Cobbler stamped candy to the back.
 Next up is the E stocking. I added a little note to Santa ;-). I stamped 'Dear Santa' in Cherry Cobbler and inked the edges with Crumb Cake ink. Crinkle up the paper a bit :-). I added a button die cut with the Sweet Buttons embosslit and tied with the Cherry Cobbler and White bakers twine.
 On to R... I used the Stocking Accents die to die cut the little Christmas Tree- covered with Snow Burst embossed Old Olive, the candy cane, and added a little package to the back. The package is just a rectangle of Designer Series Paper and the bow was made with the Blossom Bouquet Triple Layer punch.
 The other R... I was trying to think of things that go inside stockings and decided that a little spin top and a little elf doll were just the things to add to this stocking :). The elf is made using the Build a Bear dies (you really do need the Build a Bear dies :D !) and the top is made from the ornament on the Stocking Accents die. I covered the mat board ornament with some wood paper from Frostwood Lodge Designer Series Paper, which was also inked around the edges and over the paper to lessen the white shock of the paper ;-)   I tied Cherry Cobbler and White bakers twine around the top of the top and added a Jewelry Tag punch under the twine. The tag says "Super Spin Top". The elf's little sign says, "Wish Big".

                                                   
 Last, the Y. The last stocking is a mirror of the first stocking, so it would be made exactly the same, just reversing the elements to the right side.
 And here they are all together in a row. Until I decide which seam binding ribbon to use, you'll just have to visualize that the ribbon is there :D.

See you tomorrow! Have a wonderful day!

Blessings!
Barb

Supplies:
Paper: Marina Mist, Whisper White, Old Olive, Real Red, More Mustard, Basic Black, vellum, Frostwood Lodge Designer Series Paper
Classic Stampin' Ink: More Mustard, Cherry Cobbler, Crumb Cake, Old Olive
Stamps: Dear Santa, Sweets for the Sweet, Pennant Parade, Tagtastic
Dies: Holiday Stocking, Stocking Accents, Sweet Buttons embosslit, Timeless Type alpha, Build a Bear Bear,  Beary Essentials
Other: Snow Burst embossing folder, Jewelry Tag punch, 1" Circle punch, Curly Label punch, white gel pen, red gems

Monday, November 7, 2011

Cute Little Elves

I've been gone from my blog for a while again, but if you come visit here, you already know that :). For the last few months I've had ZERO mojo. I tried to create, but it just wasn't really working- I was doing, not really creating- and I had lost the joy in creating in the process of just doing. My husband, our youngest daughter, and I went around to several flea markets over the weekend and for some crazy reason, that sparked the creative side in me. Odd, right? While out visiting the flea markets and antique shops around town, I found a few retired Stampin' Up! sets that I LOVED! Today's card is made with one of those sets... 'Santa's Helpers'. I just fell in love with the cute little elves! I used Pear Pizzazz, Regal Rose, Very Vanilla, and So Saffron as my color choices. They totally work together! My little elf is colored with Stampin' Write markers, a blender pen, and the So Saffron Watercolor Wonder crayon. I prefer to use the Watercolor Wonder crayons to cover large areas on my stamped images :). 
 The sweet little candies are stamped and punched out with the 3/4" circle punch. Makes them just a little bit smaller than the actual stamp from 'Sweets for the Sweet' stamp set in the Idea Book and Catalog. The Very Vanilla background is embossed with a snowflake embossing folder, but it's a shallow emboss so it didn't really show up very well in the photo.
Both the card front and the inside sentiments are stamped in Cherry Cobbler, plus I added three stamped candies, but punched them out in various sizes of punches. The Daffodil Delight candy on the left is the full sized stamp, punched with the 1" circle punch, followed by the 3/4" circle punch in Regal Rose, and last, the 1/2" circle punch on the right.

I have posts scheduled each day for the whole week, so please be sure to come back by :). You won't want to miss the project I did with the Stocking die ;-). Hopefully, my creative spark will remain in place now :). Thanks so much for sticking with me while my mojo was on vacation! Have a GREAT day!!

Blessings!
Barb

Supplies:
Paper: Pear Pizzazz, Regal Rose, Very Vanilla, So Saffron, Pear Pizzazz Designer Series Paper from the Hostess pack (retired)
Classic Stampin' Ink: So Saffron, Cherry Cobbler, Regal Rose
Stamps: Sweets for the Sweet, Santa's Helpers (retired)
Other: Stampin' Write markers, Watercolor Wonder Crayons, Sizzix embossing folder, Nestabilities

Tuesday, October 11, 2011

Back to Christmas :)

I seem to be jumping back and forth between Autumn, Thanksgiving, and Christmas :-). I ordered Tidings of Joy a while back and never had time to ink it up, until now. I LOVE this set! The images are the cutest and since it's a line art stamp, it can be colored! I used my blender pens and my Watercolor Wonder Crayons to color this image stamped on watercolor paper. It's been a while since I've colored in an image and it was so much fun to color! Soooo relaxing! I embossed the Very Vanilla background paper, but before I embossed it, I inked the edges with Bashful Blue. You can ink the edges after you emboss, but sometimes I like solid inking around the edges. When you ink the edges after embossing you catch the embossed areas with the ink and not so much inside the debossed areas. 

Inside of card
Only one stamp set used on this card, so not so many supplies required :-). Just a note: when I colored in my image with my Watercolor Wonder Crayons, I also used the small tip end of some of my markers to color in those little teeny tiny spots- like the flowers on Mary's dress. That little tip on the markers is perfect for tiny details! List of supplies below. Have a wonderful day!!

Blessings!
Barb

Supplies:
Paper: Marina Mist, Bashful Blue, Very Vanilla, Watercolor Paper, So Saffron, More Mustard, Early Espresso
Coloring Mediums: Watercolor Wonder Crayons, Stampin' Write Markers, Early Espresso Classic Stampin' Ink, StazOn Black
Stamps: Tidings of Joy
Punches: Dotted Scallop Ribbon Border, Large and Small Star (both retired) but you can use the Stars #2 Sizzix die- the third and fourth stars down in size are the same sizes as the retired star punches
Embossing folders: Square Lattice used on the small star, Snow Burst in the Holiday Mini

Monday, October 10, 2011

Christmas Tree Treat Box

Did you know that the Petal Cone die makes a great Christmas Tree? These will be cute to place beside each place setting on your Christmas table or just for special little treats for those special people in your life. I die cut two Petal Cones from Garden Green card stock and embossed them with the new Snow Burst embossing folder in the Holiday Mini- love this folder! I inked the edges and lightly inked over the embossed design with Garden Green ink. You can add little punched out circles to your tree if you'd like. Using 1/8" circle punch outs is time consuming, but cute :D ! 

 You'll want to add your treats inside the tree before you add the tree skirt. Close up the flaps on the Petal Cone after adding your treat or little gift inside. Die cut a circle with the Clear Circle die in Very Vanilla and another circle from the Scallop Circle die in Cherry Cobbler. Emboss the Very Vanilla with the embossing folder of choice and ink over it lightly with Crumb Cake ink. Adhere to the bottom of your Christmas Tree. Punch out or die cut two little stars from More Mustard and add the little star to the top attached to a toothpick. You'll want to trim the toothpick to make it shorter though.


You could also leave out the treats and just make a few of these for decoration around your house :). Have an awesome day today!

Blessings!
Barb

Colors used: Garden Green, Cherry Cobbler, Very Vanilla

Friday, October 7, 2011

Add a Little More...

I've been trying to work on Christmas cards here and there when I'm able to steal a few minutes. I've been making individual cards with specific people in mind. I have a friend who loves everything vintage and although the card I made for her isn't exactly vintage, it has a little bit of a vintage feel to it. Enough that I think she will like it :). 


Inside of both cards
I made another card using the same design, but I added a little bit more to the design, just to show you how that little bit of extra can really enhance your card.
 I brayered the inside of my embossing folder with Blushing Bride ink, placed my Very Vanilla card stock inside, and ran it through my Big Shot. Just that little bit of color really brings out the embossing. You can't really tell in my photo, but the darker edges around the Scalloped Circle, the Blushing Bride mat, and the holly leaves are heat embossed with Iridescent Ice embossing powder so that those areas sparkle. I also distressed the edges of the sentiment banner for a little added interest. Have a wonderful day and thanks for stopping by to visit!

Blessings!
Barb

Colors used: Blushing Bride, Pear Pizzazz, Very Vanilla, Old Olive

Tuesday, September 13, 2011

Hello Doily Wreath

You knew it was bound to happen, right... that the Hello Doily stamp would be turned into a Christmas Wreath? :-) 


Have a great day today!!!!

Blessings!
Barb

Supplies:
Stamps: Seasonal Sentiments 121130 (retired), Hello Doily 122845
Classic Stampin' Ink: Cherry Cobbler 119669, VersaMark 102283
Paper: Cherry Cobbler 119685, Very Vanilla 101650
Punches: 1.75" Circle 119850
Other: Emerald Green Pearl embossing powder, ribbon

Monday, September 12, 2011

Christmas Postage

So, I go from fall projects straight to Christmas... what a jump, huh?! The next two projects were projects that I worked on last week. I meant these for later on and planned to do more autumn projects for posting, but something big came up that we had to take care of on Thursday and then on Friday we left for Chicago to see our daughter's coaches up there for training over the weekend. I hope you don't mind seeing Christmas projects so early :-).

I used three stamp sets: Seasonal Sentiments (retired) Winter Post (main catalog) and Dear Santa (from the Holiday Mini). I also used the fairly new Postage Stamp punch and my favorite snow flakes of all- Northern Frost. The Cherry Cobbler Postage Stamp punch adds a little 'punch' to the color scheme :-). 


It is about time to be working on those Christmas cards and you can see that I have started on mine ;-). Hopefully, I will have them all done by Thanksgiving so all I have to do is stick a postage stamp on them and drop them in the mailbox! Have a wonderful day today and thanks for stopping by!

Blessings!
Barb

Supplies: 
Stamps: Seasonal Sentiments 121130 (retired), Winter Post 111780, Dear Santa 123834
Classic Stampin' Ink: Marina Mist 119668, Early Espresso 119670
Paper: Bashful Blue 105120, Marina Mist 119682, Whisper White 100730, Bashful Blue Designer Series Paper (retired)
Punches: Scallop Edge Border 119882, Scallop Trim Border 118402, Dotted Scallop Ribbon Border 119275, Postage Stamp 122344, 1" Square 124094, Ticket Corner 119867
Dies: Petal Cone 121810, Northern Frost 120901
Other: Textured Impressions Embossing Folder: Stripes 123128, Basic Pearls 119247

Tuesday, December 21, 2010

Merry Christmas!!

I will be missing from my blog for a few days. My daughter and I are sick- again :-(. Apparently, we caught this from her coach- who is also sick- again. He was sick a couple of weeks ago and so were we. He thought he was over it and we thought we were over it. My daughter and I started off with scratchy throats last night and this morning- ick- sick! Another reason I will be missing from my blog is because I have soooooo much to do in the next three days. I don't even want to look at my to do list at this point, although mentally, that big list keeps playing over and over in my mind. Hopefully, I get it all done. I will be doing it whether I feel icky or not, so I hope I feel better tomorrow! In the meantime, I wanted to take a minute to thank all of you for visiting my blog this year. I have appreciated your visits so very much and all of your comments have made my day each time :-). I have also appreciated your patience when I have been so busy I haven't had time to see the walls of my stamping room, let alone keep my blog updated. So, for all of you, I am posting a Christmas card that I made just for my blog visitors. I wish each and every one of you the most blessed, joyous, and most memorable Christmas of all. 
I will see you after Christmas!!! I plan to LOCK MYSELF in my stamping room the day after Christmas for the whole day, so I should have some stuff to post next week! Merry Christmas my friends!!!

Hugs and Blessings to you!
Barb

Monday, December 20, 2010

Candy Wrapper Die

I finally got the Candy Wrapper die a couple of weeks ago and it's quickly become one of my favorite dies. I made a bunch of these for little hand outs during the Christmas Season. You can put chocolates in them or small gifts. I've been putting chocolate in mine :-). 
To make these, I die cut the Candy Wrapper and embossed just down the center of my die cut so that the ends are not embossed. After embossing them, I added some gold ink with a sponge dauber to make the embossing stand out. The gold really brings out the red and makes them look so rich. I stamped a sentiment and punched it out with the Small Oval punch and added a gold snowflake on a dimensional from the Northern Frost strip die. Tied the ends with gold cord and done!! Easy peasy...and fast! Thanks for stopping by today. I know everyone is busy- Christmas is almost here!!!! Have a wonderful day today!!

Blessings!
Barb

Supplies:
Stamps: Teeny Tiny Wishes-115370
Card Stock: Cherry Cobbler-119685, Very Vanilla-101650
Ink: gold
Dies: Candy Wrapper-120890, Northern Frost-120901
Punches: Small Oval-119855

Friday, December 17, 2010

Jolly Holiday!

Good Morning everyone! Yesterday I made some little mini scrapbooks from the Jolly Holiday Designer Series Paper. I LOVE the Jolly Holiday paper :D. I used the Scallop Square die to make the covers and the pages. I normally use acid/lignin free matboard for my covers. The matboard makes nice sturdy covers, but it's also archival quality. It's really easy to die cut the Designer Series Paper for the covers with the same die- no sanding, no fussing, a perfect fit :-).
 The first page as you open the book...
 I alternated the inside journaling/photo pages with Old Olive journaling lines/Cherry Cobbler photo mat....
 With Cherry Cobbler journaling lines/Old Olive photo mat. I stamped the little deer from the Winter Post stamp set (LOVE that set!!!) with Early Espresso ink on each journaling page.
To finish off the book, I tied two little jingle bells with gold crochet thread to one of the binding wires.These don't take long to make and they are great little brag books to haul around with you or make several with different themes and keep them in a basket on your coffee table. These are a good size for sharing your favorite photos with family and friends without taking up too much space. I hope you all had a wonderful week and that your Christmas To-Do lists are very small :D. Mine is still pretty big, but I'm checking stuff off my list one by one! Have a blessed day today!!!

Blessings!
Barb

Supplies:
Stamps: Winter Post-111780, Delightful Decorations-116517, Sentiments- from retired sets
Card Stock/Paper: Very Vanilla-101650, Cherry Cobbler119685, Old Olive-100702, More Mustard-100946, Jolly Holiday Designer Series Paper- 117159
Classic Stampin' Ink: Early Espresso-119670, Old Olive-102277, Cajun Craze-119671, Cherry Cobbler-119669
Stampin' Write Markers: Old Olive-100079, Real Red-100052
Dies: Scallop Square Bigz Clear-115950
Punches: Modern Label-119849, Word Window-119857, 5-Petal Flower-119880, Ornament-119847
Other: Iridescent Ice embossing powder-101930, VersaMark pad-102283, Bind-it-all